Because of the mechanization of Configuration Manager’s
OSD feature, and some peculiarities of WinPE’s view of disk partitions,
configuring RAID arrays poses some problems for the OSD process. The
wizard used to “Create an IBM® Server
Deployment Task Sequence” is a way of creating the somewhat complex
set of steps required to manage the reboots required.
About this task
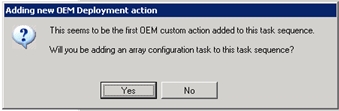
An existing task sequence (created before loading the
Deployment Pack) does not have all of these steps in place. The first
time you add an IBM RAID configuration
step to an existing task sequence, the program detects the need for
these extra steps, and offers to let you use the same wizard to insert
them.
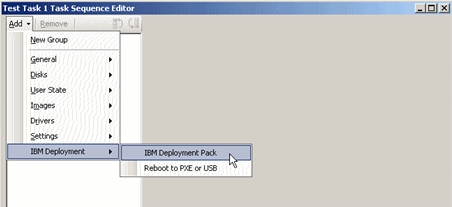
Figure 1. Adding a RAID configuration to
an existing task sequence
When you first attempt to add an IBM Deployment Pack step, you are prompted to
determine whether you plan to add a RAID configuration step. This
decision determines whether the wizard is needed, or whether you plan
to edit the steps without the aid of the wizard.
Figure 2. Prompt to determine if a RAID configuration step is being added
If you are adding a RAID configuration, the program prompts
to determine whether you want to use the wizard to help get all the
steps in the right order. Doing so is highly encouraged.
Figure 3. Prompt to determine if reboots should be added
automatically
If you click
Cancel, you can still
add RAID configuration steps, but you the wizard does not help you
get all of the required reboots inserted properly. This is discouraged.
Pressing
OK launches the same wizard that is
used in the Create an IBM Server
Deployment Task Sequence custom action.
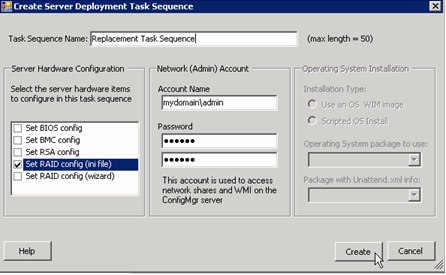
Figure 4. Create
Server Deployment Task Sequence wizard
After filling in the wizard dialog, pressing
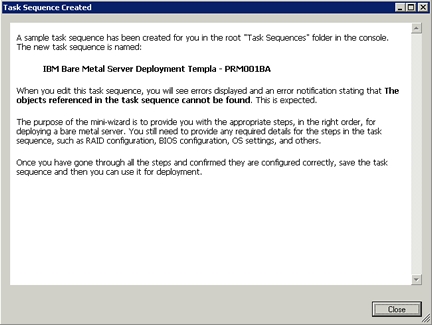
Create creates
a new task sequence to avoid making unwanted changes to your original
task sequence. Use this new task sequence for your new deployment
task; you can delete the original sequence if you no longer need it.
Figure 5. Task Sequence Created message
After creating the copy of your original task sequence,
the original task sequence has "edited," status, but has not
been saved.
To proceed, you must close your original task sequence
without saving the changes. Then open the new task sequence to continue.
The program does not let you save changes to the original task sequence.
After
closing the
Task Sequence Created information
dialog, you see the following message:
Figure 6. Confirmation
of new task sequence creation
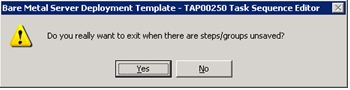
At this point, click
Cancel, then
click
Yes on the following confirmation prompt:
Figure 7. Confirmation of exiting the original task
sequence
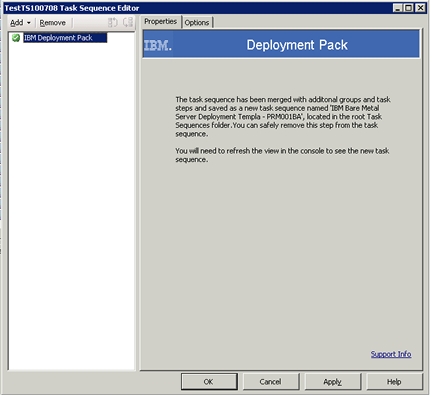
Locate the new task sequence in the list of task sequences,
right-click the task sequence, then click
Edit.
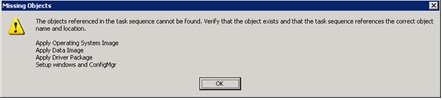
When you open the new task sequence, it is normal for some information
to be missing from the newly-created steps. You see this dialog:
Figure 8. Missing objects when editing the new task
sequence
Click each item in the list that has a red ‘X’ next to
it, then provide the required information. Finally, save the new task
sequence, then advertise it for deployment.