Required: Select the IBM version of the Configuration Manager boot
image. The installation program copies and modifies
the original Windows® Imaging
(WIM) files for x86 and x64 systems, which are Windows Preinstallation Environment (WinPE)
boot images, to add IBM-specific drivers and other files.
If
you do not use these modified images, the IBM deployment tools might not work properly.
When
upgrading from a previous version of this product, existing task sequences
that use these custom actions are not automatically updated. To function
correctly, you must open each task sequence action that uses a custom
action and make some minor edit, such as adding a “.” to the description
and then removing it. After editing, apply your changes to refresh
the properties of the custom action and save any new data or formatting
required to function with the new version. You may also see a red
‘X’ on some task sequence steps – click on each one, and provide any
missing information.
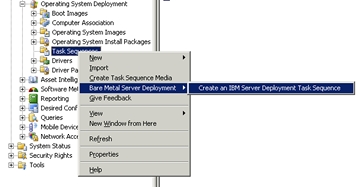
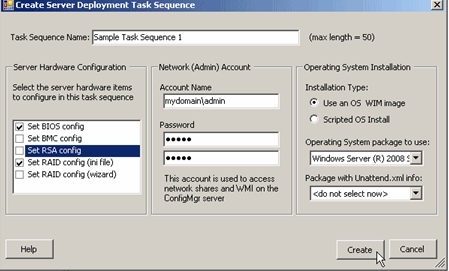
Click Create to create a task sequence
that contains the hardware configuration steps specified and some
sample steps for deploying the operating system. When
you click Create, a new task sequence is created
that contains all the tasks necessary to deploy a server from bare
metal, including hardware configuration (BIOS, array controller, remote
access controller), partitioning, and operating system installation.
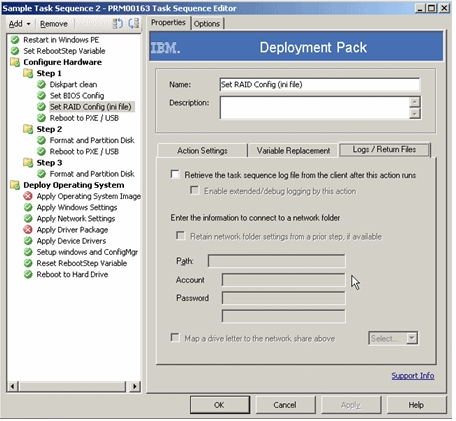
This sample task sequence also includes the necessary reboots
in the appropriate sequence. The task sequence is broken into several
groups that represent the logical organization of the task sequence
steps and also represent the sets of actions to be performed in a
reboot sequence.
Important: The grouping and order
of the sample task sequence is important. Do not delete any groups
or remove any of the steps for rebooting to PXE or setting task sequence
variables. Also, do not modify the conditions set on the groups. Doing
so might cause the task sequence to function incorrectly.
Important: After the task sequence is created, go through each
step to confirm all of the settings. The task sequence that is created
is a sample that contains several example values, such as network
login accounts and drive paths, that cause the task sequence to fail.
Modify the values for your specific environment.